How to Set Up an Email Account in MS Outlook 2010, 2013, and 2016
How to Set Up an Email Account in MS Outlook 2010, 2013, and 2016
Category: Emails
This step-by-step guide will help you set up a new email account in Microsoft Outlook on your Windows computer, with applicable instructions for other operating systems. Follow each screen for successful email setup.
Steps to Set Up Your Email Account in Microsoft Outlook
- Open Outlook and go to the "File" menu.

- Click on Info.
- Select the Add Account button.

- Choose Manually configure server settings and click Next.

- Select Internet E-Mail and hit Next.

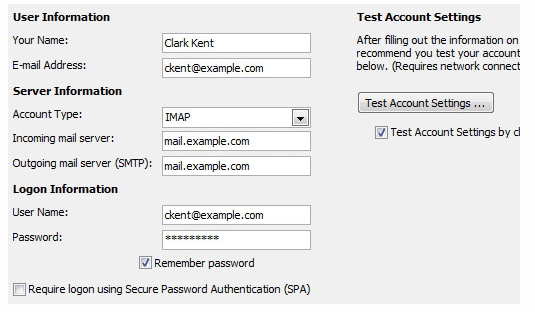
- Enter the following details:
- Name: Your display name for outbound emails.
- Email Address: Your email address.
- Account Type: IMAP or POP3 (IMAP recommended).
- Incoming Mail Server: mail.supremecluster.com
- Outgoing Mail Server: mail.supremecluster.com
- Username: Your full email address
- Password: Your email password (ensure Secure Password Authentication is not ticked).

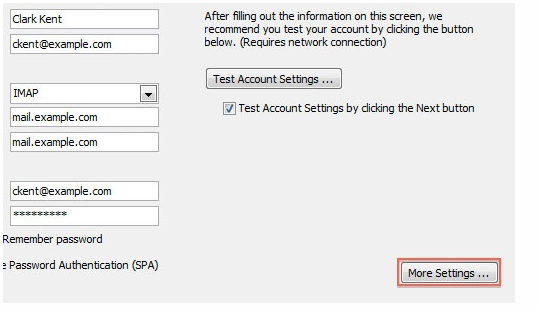
- Click More Settings at the bottom right.
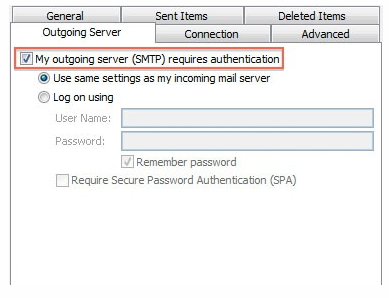
- Go to the Outgoing Server tab and tick the box for My outgoing server (SMTP) requires authentication. Select Use same settings as my incoming mail server.


- Adjust Port settings:
- IMAP: Port 143 with no encrypted connection
- POP3: Port 110 with no encrypted connection
- SMTP: Port 25 or 2525 with no encrypted connection
- Save all changes.
- Return to the initial screen and test the settings to complete setup.

Tags: configure email in Outlook, email account setup in MS Office, MS Outlook email setup, Outlook 2010 email setup, Outlook 2013 email configuration, Outlook 2016 email account setup
